What follows is a step-by-step guide for digitising audio cassettes.
It is based on experiences during my most-recent (August 2015) ripping spree.
Before you start, ask yourself what it is that you want to digitise: If it's stock standard pop fodder from your youth, you're better off finding
the CD on eBay or in the supermarket's bargain bin. If it's on iTunes or Amazon, don't waste your time ripping tapes; spend a few bucks and
"support the artists". The quality is likely to be better, too.
If you want to preserve or backup historically-relevant tapes, then you shouldn't need this guide because you're a qualified
expert and have already done so with professional equipment before storing the originals in a climate-controlled archive.
If your reasons for bringing your tape collection into the digital world lie somewhere inbetween, then your four main components will
be a DAW (Digital Audio Workstation = computer), a decent cassette player, suitable software, and you!
The last time I used a commercial all-in-one software program named Magix Music Cleaning Lab. The freeware tool Audacity comes
highly rated but I used it only for importing the audio, not editing it. The bulk of the work was done with Adobe Audition 3.0 (recently
made available for free). Soundforge, Sony Vegas, and NCH WavePad seem to be other capable options. Either will do the job,
and they all have a learning curve.
If you've never done this before, I suggest you learn to use Audacity as a complete solution.
Have a look at the hardware requirements of the software you choose because those will determine the next component.
A computer: If you replaced your desktop computer in the last few years, that old clonker will probably do
just fine. I restored a 3GHz Pentium 4 with 1GB RAM, then installed Windows XP SP3 and larger hard drives for this project.
Expect to work with up to 2GB of file per tape. Admittedly, it was during certain operations with
Adobe Audition that 1GB of RAM turned out to be a bottleneck. Adding an extra 512MB made a world of difference.
I cannot comment on the quality of the on-board sound card of a modern laptop or desktop computer but try to avoid it as a
matter of principle. An external USB sound card would be my preferred choice but I ended up using the same old dedicated
Creative Labs SB PCI512 card as last time. Keep in mind that a PC is a noisy device (more on that later). I would imagine
that most sound cards from the current millennium will deliver acceptable results.
The same will probably hold true for Apple or Linux environments.
Find a decent tape deck. Yes, I said "tape deck" because your old boombox or crappy bookshelf stereo will not do.
Use "Dolby C" as a shopping criteria (if it has Dolby C, it's likely to be a high-end deck). Your chances of finding a good hi-fi
deck on eBay or similar are excellent. If the asking price is beyond 50€, then you're likely to get a capable unit (and would be able
to re-sell it for a similar amount afterwards). Unless you can get one of them for free, I wouldn't waste a cent on
Alesis or similar units.
I was lucky to score a Pioneer CT-447 in prime condition from a colleague.
Make sure the transport mechanism works and the belts aren't brittle or worn. Clean it inside and out. Give your new/old
toy some love and a good workout. Clean the heads and the pinch roller with isopropyl alcohol.
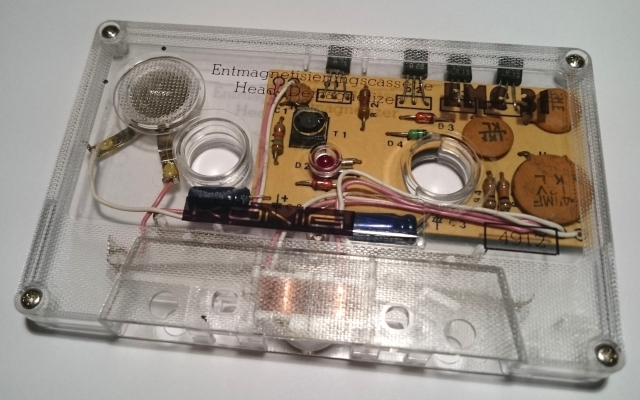
Adjust the head's azimuth, if needed, and demagnetise it using something like this:
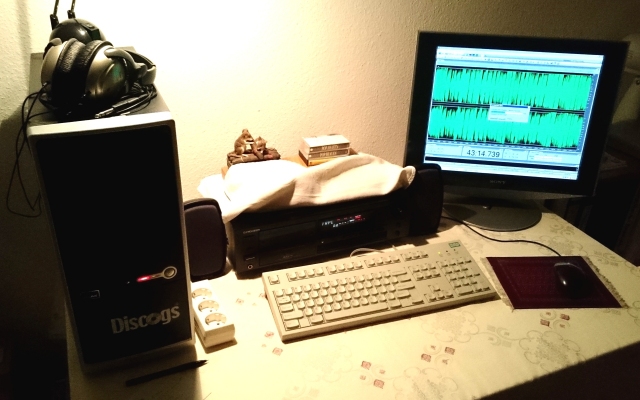
Once you've collected all the components, it's time to combine them into a workstation.
Unless it's a trusty old tape deck you've been using for ages, familiarise yourself with your "new" deck and its functions.
You should have cleaned, adjusted and demagnetised the heads by now. Listen to a variety of tapes you're familiar with, and most
certainly the ones you intend to digitise. You'll be surprised how many tapes you're going to reconsider wanting to copy.
Listen with headphones (not earbuds) plugged straight into the deck (NOT via computer or amplifier). Calibrate your ears
and your mind to the sound of each type of tape and experiment with any settings your deck may have, particularly which Dolby
Noise Reduction system works best. I've found that commercial tapes (usually type I) recorded with Dolby B sound best when played
back with no Dolby NR at all while chrome tapes (type II) sound best when played back through Dolby C, even though they may have
been recorded with Dolby B. Your mileage will vary -- but familiarise yourself with your tape deck, its functions, your headphones,
and how they sound natively.
All tapes will be different. This is a subjective opinion.
Word of advice: Don't worry too much about that dreaded tape hiss. If the higher frequencies of the audio on a tape sound too
muffled with Dolby NR activated, we'll transfer the tape without Dolby and remove the hiss later through software. If this applies
to all of your tapes (including commercial ones), then something else is wrong. What we're trying to do is retain as much of the
dynamics as possible.
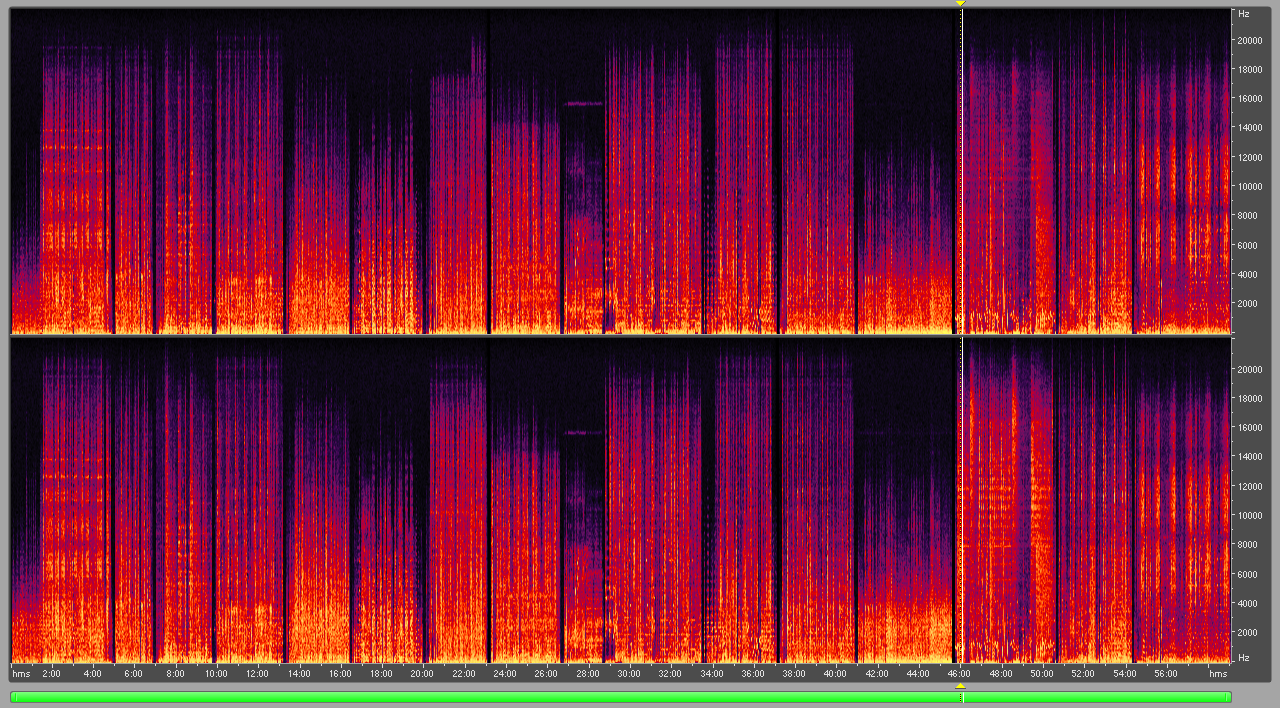
Here, for instance, is a spectral view of a self-released 70µs tape recorded with Dolby B NR:
Unfortunately I don't remember if it was played/ripped with or without Dolby but damn! Look at that frequency response -- it pushes 22kHz.
That's insane!
Besides, I'd be surprised if anyone reading this can hear anything above 16kHz anyway.
We'll now connect your tape deck to your workstation.
The wrong way:
There are many guides and YouTube videos out there which will instruct you to use your deck's headphone jack and/or your computer's microphone
jack. They're wrong. Doing so can even cause equipment damage. While, realistically, it will "work" and your hardware should survive, your audio will
sound poor because neither port is operating at line level (the headphone jack
outputs amplified sound way above line level while your microphone jack expects an unamplified signal below line level of -10 dBV).
Also: Most mic(rophone) jacks are mono and therefore unsuitable for stereo music.
The right way:
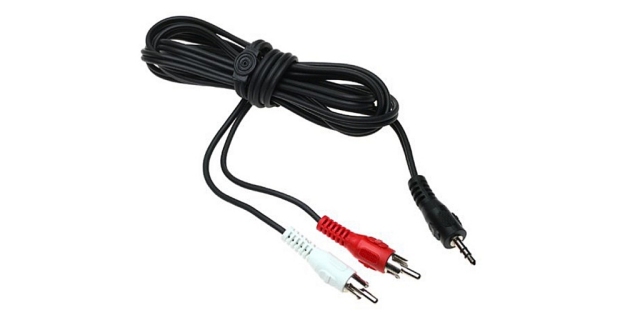
Connect the line-out jacks (usually unbalanced RCA) of your cassette deck to the line-in jack (typically a 3.5 mm TRS socket) of your PC's sound
card, making no unnecessary detours via other equipment or adapters and not mixing up the left- and right channels. The right channel is always
the one with the red connector. Older tape decks might have DIN sockets.
The line-in jack of your PC's sound card is usually (light) blue and should be marked accordingly. Consult your sound card's user manual if you must.
Use a quality, commercial Y-cable, they're cheap. Avoid placing the cable near power bricks or transformers, nor should it be run parallel to power cables.
Now plug your headphones into your computer's headphone jack. You will probably need an adapter here, which is fine. Put on your headphones.
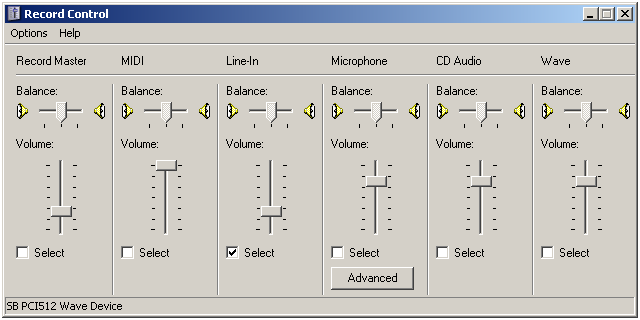
Open up your operating system's sound mixer settings.
Your settings may differ slightly from the Windows XP ones shown here.
In the recording control setting, select only line-in (being your tape deck).
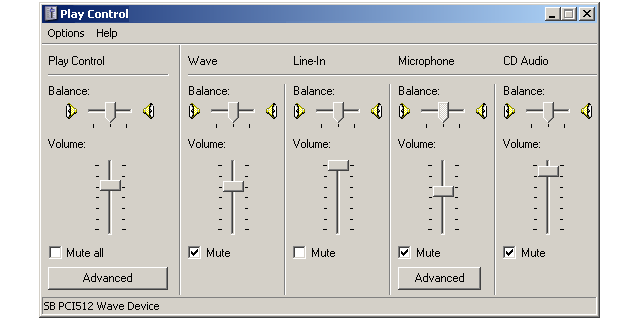
In the playback control setting, mute everything except line-in and "Master" (or similar).
You wouldn't want an unexpected system sound to ruin your recording.
You may even notice some background noise disappearing at this point (remember what I said about computers being noisy?)
Grab your loudest tape or a reference tape, if you have one.
Put it in the deck and press "play". When you hear it coming through your headphones, you're halfway there!
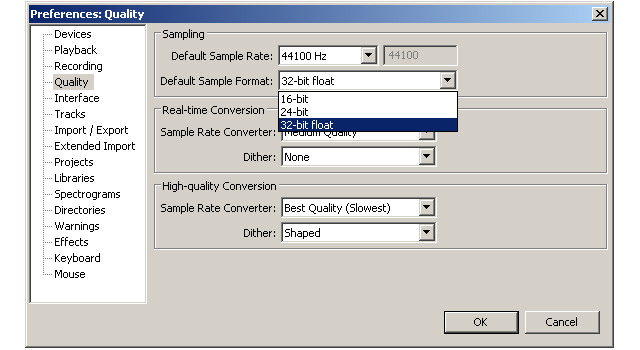
Launch your recording software. Find the settings for the sampling rate of recordings. In Audacity, it's under Edit > Preferences > Quality
The default will probably be at 16-bit / 44.1kHz. This is often termed "CD-quality" and would be adequate for most users and for tape
(although I did sample at 32-bit floating / 44.1kHz and will probably push it to 192kHz for vinyl records).
Save the settings. Your tape should still be playing.
Click "record". You'll see some indication that input is coming through and is being recorded.
Now, go back to the mixer setting and adjust either the recording or playback slider for the volume of the line-in signal so that the loudest
peaks do not exceed 0 dBm. Watch the display of the incoming sound waves while doing so. Set them to peak between around -3 dBm to - 5 dBm while importing
(we'll make final adjustments later) -- so long as there's no clipping: that's an indication you're overdriving your input; everything above 0 dBm will be
cut off and lost. You do not want that. If you used the microphone input like you weren't supposed to, this will most certainly be happening.
Audacity explicitly points out clipped samples (other software may do so differently, or not at all).
Remember this step because you should do this before every recording session and for every tape: Windows sometimes forgets its mixer settings,
and each tape will have different output levels. It happens more than you'd imagine.
Press "stop" on the tape deck as well as the recording software. You now have some sampled audio. Give it a listen, paying mind to louder as
well as quieter sections, including any pauses between songs. Do you hear any background noise or rumble? Does it sound as good as the original cassette?
If not, you may need to review some of the previous steps or experiment with different settings (Dolby on/off).
Once you've gotten it to sound like the original tape, congratulations: You're on your way to becoming a tape ripping guru!
Grab a tape you're very familiar with -- preferably one where everything was recorded
from the same source. Press "record" on your importing software. Fast-forward the tape to a loud section, listen to it and make adjustments to the
incoming volume via the mixer settings as necessary and as described above. Turn on/off Dolby B/C/S until the tape sounds the way it should.
You're still wearing your headphones plugged into the PC, right?
Rewind the tape, discard what you've just "recorded" and start a new recording session.
Hit "record" on your recording software and "play" on your deck using these optimum settings you've just discovered (yes, in that sequence because
we'll be using the recorded "ambient noise" later to train the filter how to get rid of the tape hiss).
That's it! You're busy sampling ripping your first audio cassette.
Unless it's an auto-reverse deck, simply flip the tape over once it's finished playing the complete first side and press "play" for the B-side.
Do not bother to pause or interrupt your recording software; it's easier to edit out that break (while flipping the tape over) or any runout silence
once you've imported both sides.
You should obviously "stop" recording once the B-side is finished playing.
There's a fork in the road ahead: One path leads you to step 8 (cleaning and editing the imported recordings), the other
loops back to step 6.
Me? I personally took the structured route and imported all tapes I wanted to import (some purposely played with different noise
reduction and other settings for the sake of experimentation) before settling down to editing them in bulk.
Choose what you think is best for you and your schedule. Remember that it takes more than just 60 minutes to import (and save) a
60-minute tape, and realise that it can take a similar amount of time to do any final editing and cleaning! Time is the fifth component.
However, if you're an archivist saving rare historical recordings for the afterworld, your work is just about done. You will not edit,
you will not compress and you should certainly not modify the imported audio. You will title and catalogue it and make multiple copies
before filing the original away safely. For everyone else, it's on to the next step:
Many people are perfectly happy using Audacity or other software which offer similar functions. The workflow, screens and settings
that you see below may therefore deviate from what you will see -- but the general principle remains the same.
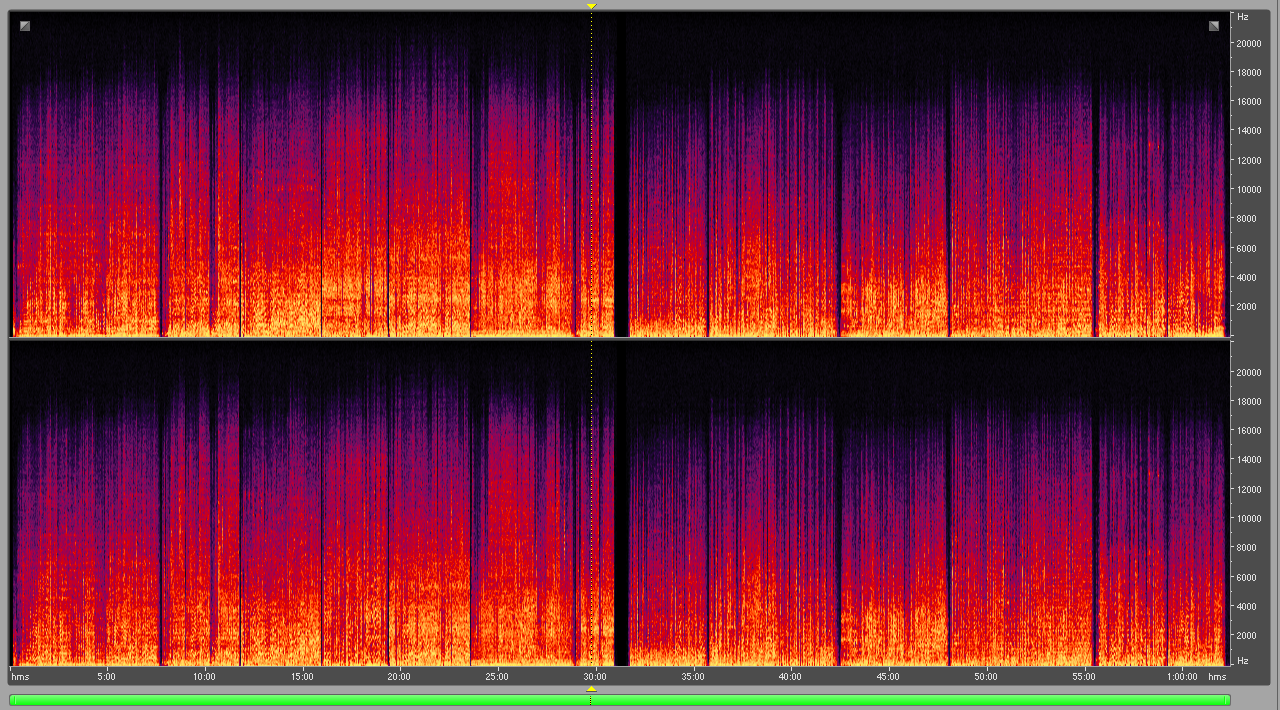
Open a ripped tape file (previously saved as a uncompressed WAV/AIFF).
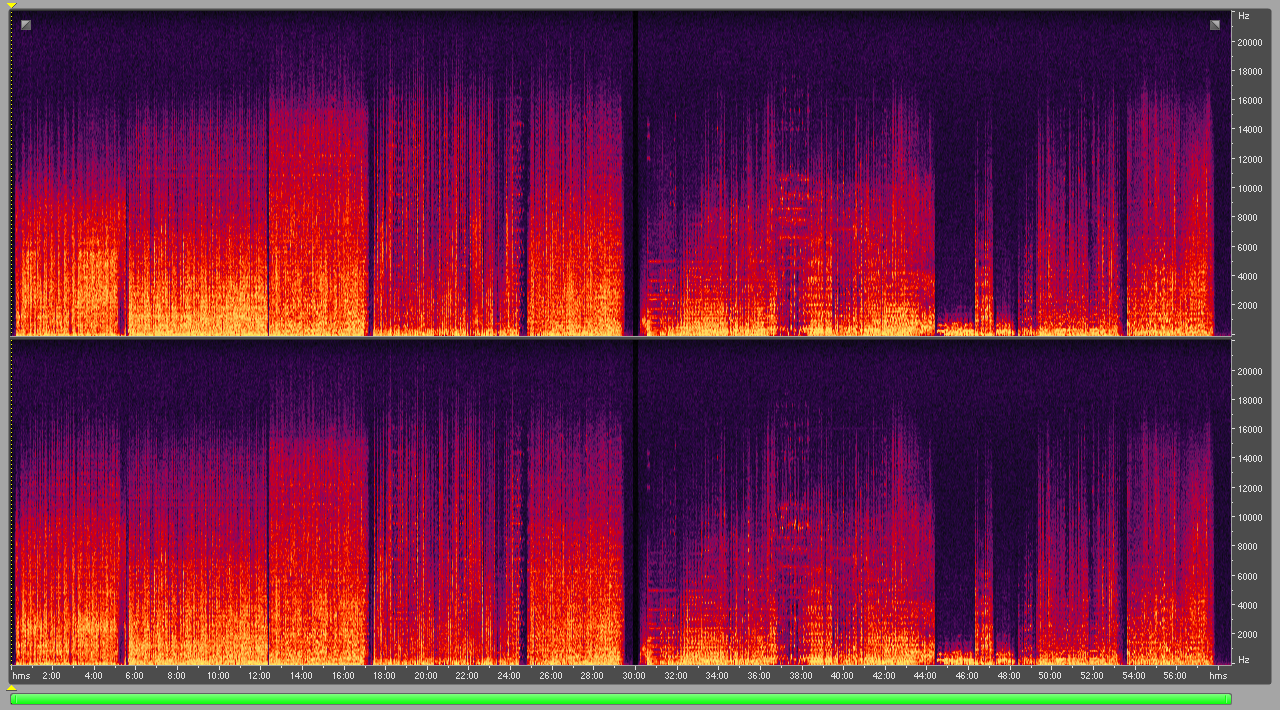
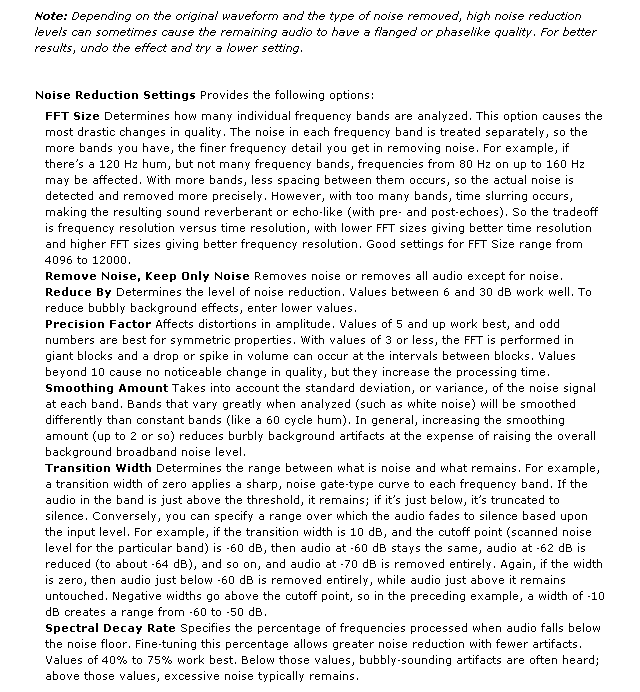
Change to "Spectral View", if your software supports it. This is the preferred view when removing white noise (tape hiss) and other interference.
Click the image above for a larger view so you can clearly see the narrow column of "blackness" at the 30 minute marker. This is where no
sound was recorded while the tape was flipped over. And that not-orange section just to the left of the black bar is runout silence: last song on
the A-side finished, no music, just the tape's own noise.
That "purple haze" you're seeing throughout is the noise we aim to eliminate and achieve this:
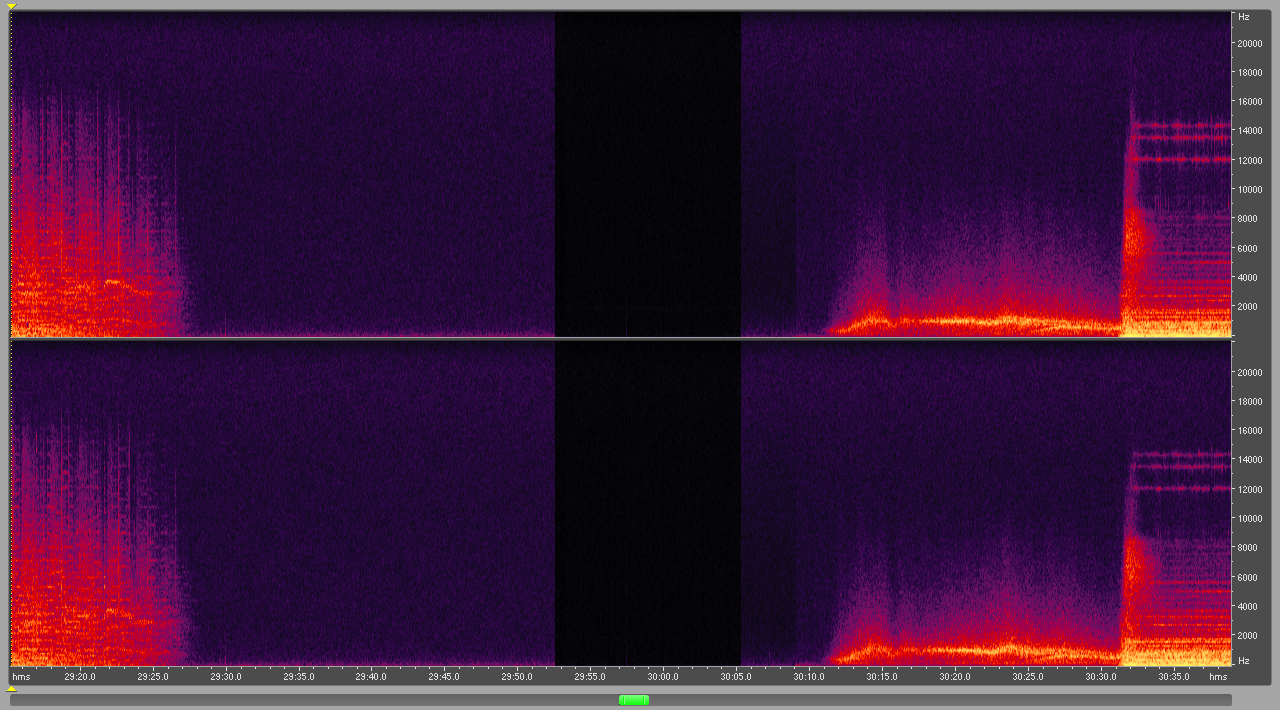
Below is a view of a different chrome tape, zoomed in to the spot where I had to flip it over:
The Noise Reduction process
Select a small section of "pure noise" that is likely to appear throughout the entire tape (typically the hiss) and visible as that low-level purple
floor of fuzz after the 29:30 marker.
Listen to it carefully. Loop it over and over and make sure it's a constant sound throughout the length of your selection. The 5 seconds highlighted in
the example below are far more than you'll ever use, you should aim for about 1 second's worth of constant noise. Try to work with the section between the two
tape sides because that's where you're likely to find "pure noise" (after a song has ended and before the next one starts) and because on rare occasions one side
of a tape is noisier than the other.
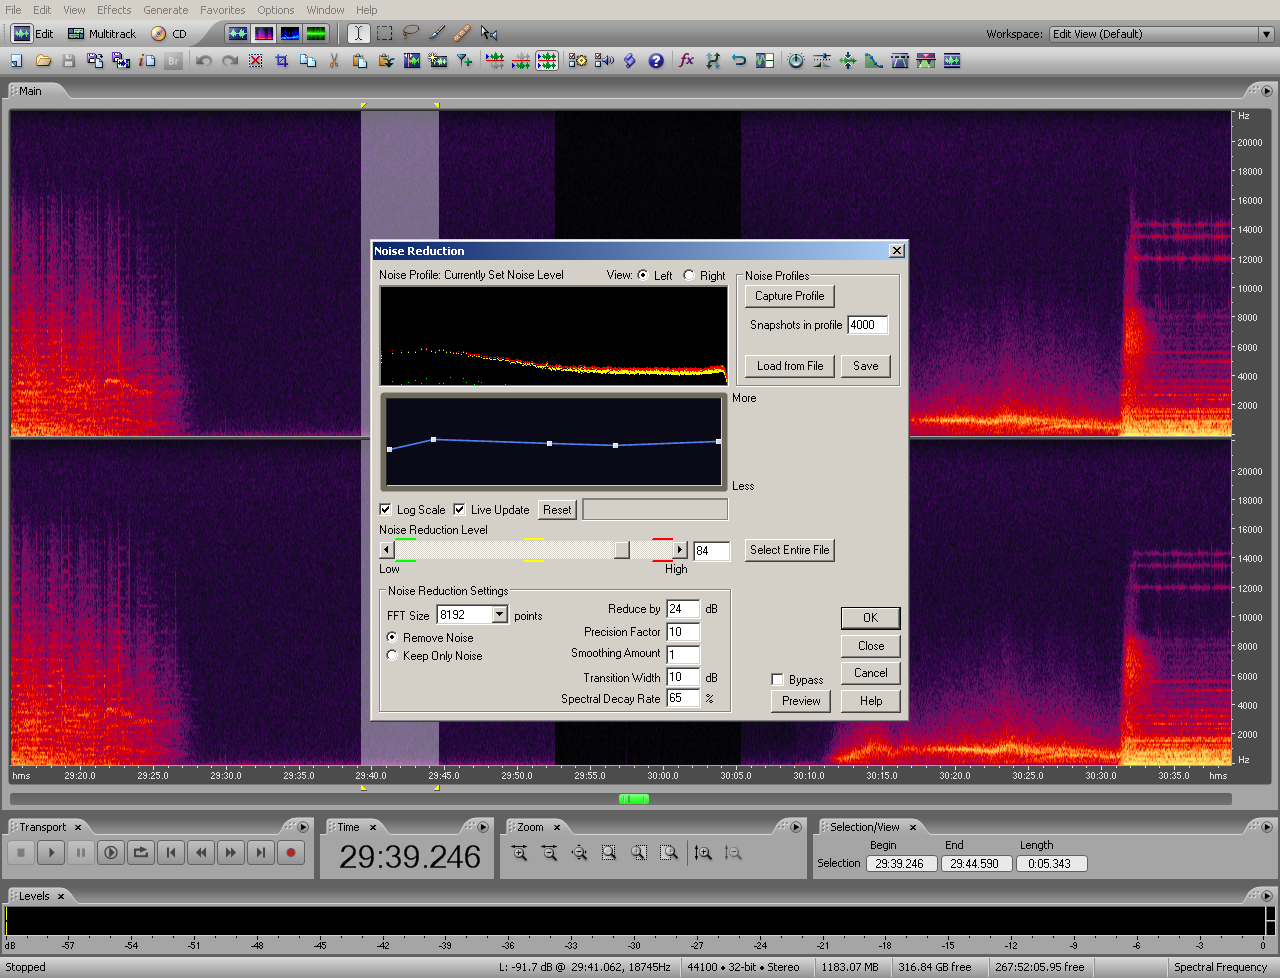
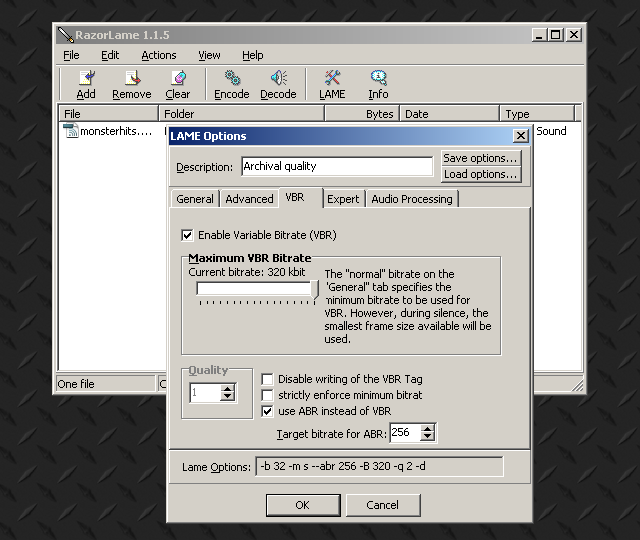
This is the noise reduction settings window under Adobe Audition:
Feel free to experiment with different settings. The ones I've used here were found somewhere on the interwebz and serve me well.
The one adjustment you do need to make for each tape is the "amount" of noise reduction to apply: if you set it too aggressively (75 is an
average value), you'll remove too much of the music -- along with the noise. Audition allows you to listen to the "removed noise" only (Keep Only Noise),
so experiment with the slider until you get a good compromise of how much of the noise you've sampled has been removed, and how much of the music was
lost in the process.
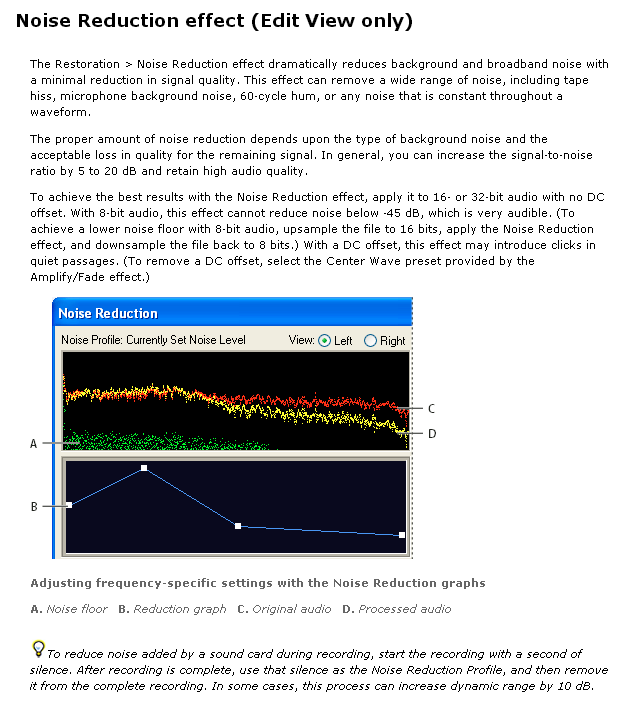
The following screen captures are taken from Adobe Audition's "Help" section.
In some cases, it might be useful to run through this twice: first a less aggressive setting using the "ambient system noise" as a sample
(taken from the leader tape -- see "Part 5: Your first recording"), then a slightly more aggressve setting with a sample
taken from a piece between songs or sides (as described above).
If you've never done this before -- please check the "Help" section of your respective software, it'll hopefully be of more use than
this brief guide. Don't be afraid to experiment. This is the section where each software, each tape, each setting, and each person's ears
and sensitivity to noise will be different.
Sorry, no magic bullet here! This is trial, error, experiment-experiment-experiment, experience.
Once you've removed the "captured profile" of noise from your selection, your view should resemble something like this:
When you listen to the cleaned sections, the difference can be quite astounding.
Undo the change to the small trial section you just made and select the entire waveform. Apply the same filter. This operation can take several
minutes, depending on the duration of the imported tape and your PC's performance.
If you're happy with the results of the noise reduction process across the entire tape, this would be a good time to save your work. Make sure
not to overwrite your original imported audio file by accident; save your experimentations under a different name.
Revert to the saved original if you screw up.
The next step will be to cut out any excessive blank sections, such as at the beginning of the importing session and between what used to be the
A- and B-sides (when we flipped the tape over). There may even be a few clicks or other unwanted noises between different recording sessions of the
original tape that you might want to remove or silence out.
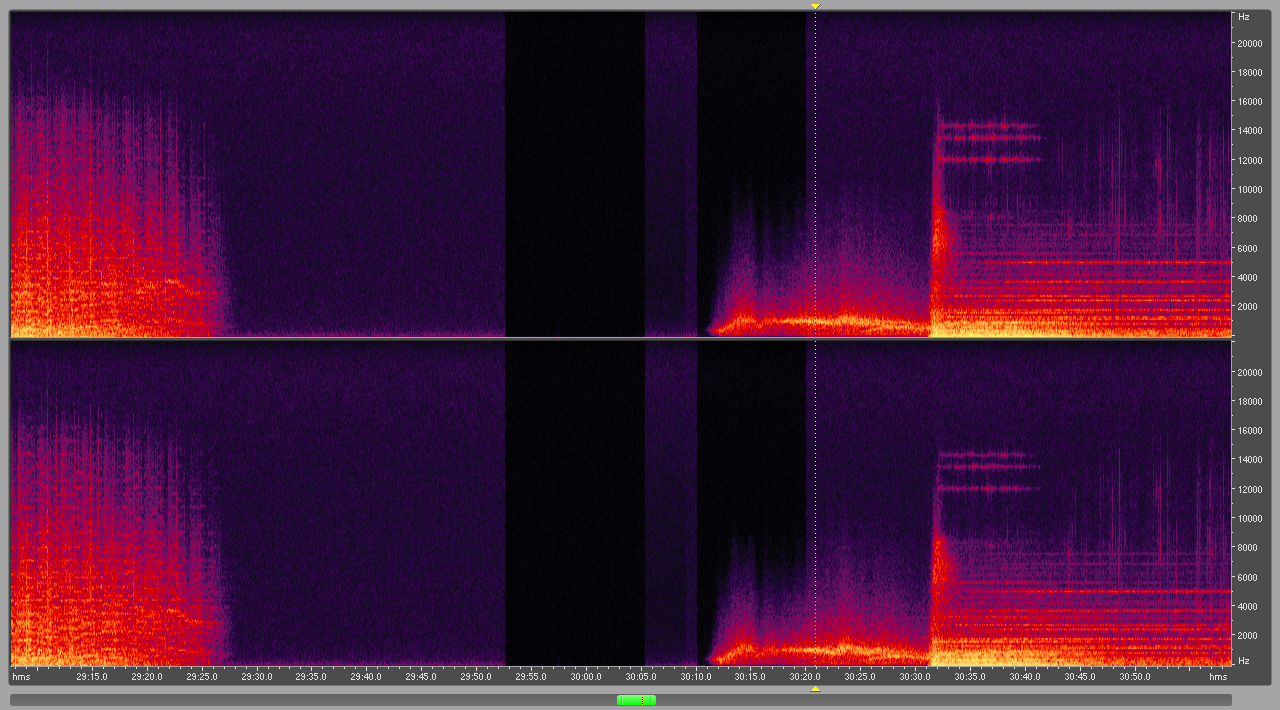
As part of this process I usually also adjust the volume levels of individual tracks or apply fade-ins/fade-outs, as necessary. Your requirements
will vary for each tape.
If you have a "mixtape" that came from different sources, this can quickly become
a tedious and time-consuming task but make sure not to boost any sections above a level of 0 dBm.
Also: Adding equalisation or other "enhancement filters" is something I generally advise against -- tempting as it may be. While in some cases
it may actually liven up a bland performance or bring genuine improvements to the overall sound of a recording that was poor to begin with,
in many cases you're likely to cause harm. Use enhancement filters sparingly, if at all.
What sounds good on your headphones now may sound awful on another system later.
Save your final, cleaned tape rip under a new name in an uncompressed format!
Repeat the steps above for each imported tape before moving onto the next stage: converting the uncompressed file to a final format of your choice.
As I said at the beginning of this guide, you should start with a good idea about what it is you want to digitise, what you want to
play back your converted tapes with, and obviously what format you want to store them in.
If you're a historian, you're not reading this because your work was already finished at step 7.
If you're a mortal human, you'll want to export/store in the format and highest bitrate your playback device can support.
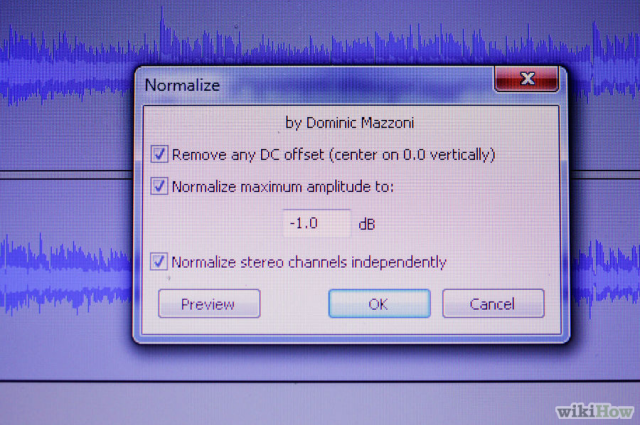
Most any digital audio device today supports MP3 files. 320kbps is the highest bitrate
supported by the MP3 format. Use it. Disk space is a non-issue today.
The LAME encoder with the RazorLame frontend is my weapon of choice. Unless you've done this before, stick to the included presets.
I consider them perfectly adequate, most differences are largely academic.
Nor does it have to be lossy: you could simply hold on to the original PCM WAV/AIFF files and/or convert to lossless formats such as
FLAC, ALAC or APE. Purveyors of these formats will surely know what to.
So far, we've only saved the entire tape as a large, single file.
Some folks prefer to save the individual tracks. Whereas I did extract a few songs manually using Audition, here's part of a
CNET article that describes a bulk operation using Audacity:
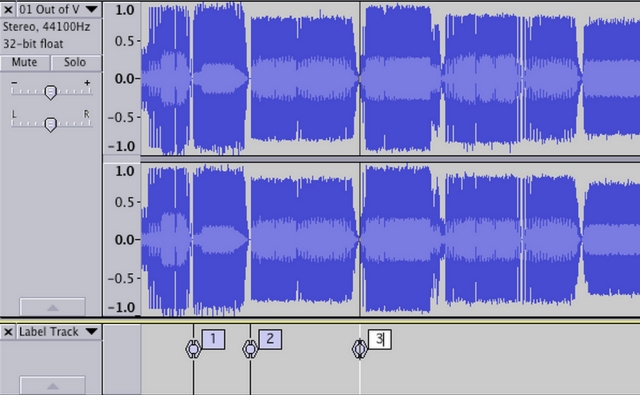
Instead of individually copying and pasting each song into its own file, we're going to drop markers at the beginning of each song
and then export them in one batch.
Find the beginning of the first song, click it to place the cursor there, and then go to the Tracks menu and select Add Label
at Selection. Now, do this for the rest of the tracks and number them as you go. Typically you can eyeball this by looking for spaces between
tracks, but always check the markers against the track listings.
To export separate tracks at once, use the Export Multiple command in the File menu.
Use whatever method you feel most comfortable with.
I ranted about "music browsers" and media managers a few years ago.
How you go about naming and/or tagging your resulting files is a matter of personal choice and will likely depend on what you've ripped,
how you intend to archive it, and where you wish to play it back.
iTunes is the preferred method for many people. I'm happy using WinAmp for individual files while for bulk work such as naming all
tracks from the same album, mp3tag is my trusty workhorse.
Further details on tagging are beyond the scope of this little tuturial.
What about the quality?
None of this matters if the resultant digital audio files sound like the dog's breakfast.
With a decent tape deck, halfway decent source tapes, a bit of sound editing skill, and a good dollop of diligence you stand a
great chance of bringing your old cassettes into the 21st century -- and have them sound accordingly.
What was started as a personal blog post describing the latest tape ripping session has turned into this
how-to guide for digitising audio cassettes. I hope you found some of the advice and experiences useful if
you've never attempted this before, or amusing if you have.